Create & manage blueprints
Learn how to create your first blueprint, add new versions, and effectively use the blueprint form.
How-to Guides:
- Create a blueprint for STEAM games
- Create a blueprint for existing Docker containers
- Create a blueprint using LinuxGSM
- Publish a blueprint on the marketplace
The Basics
Create a Blueprint�
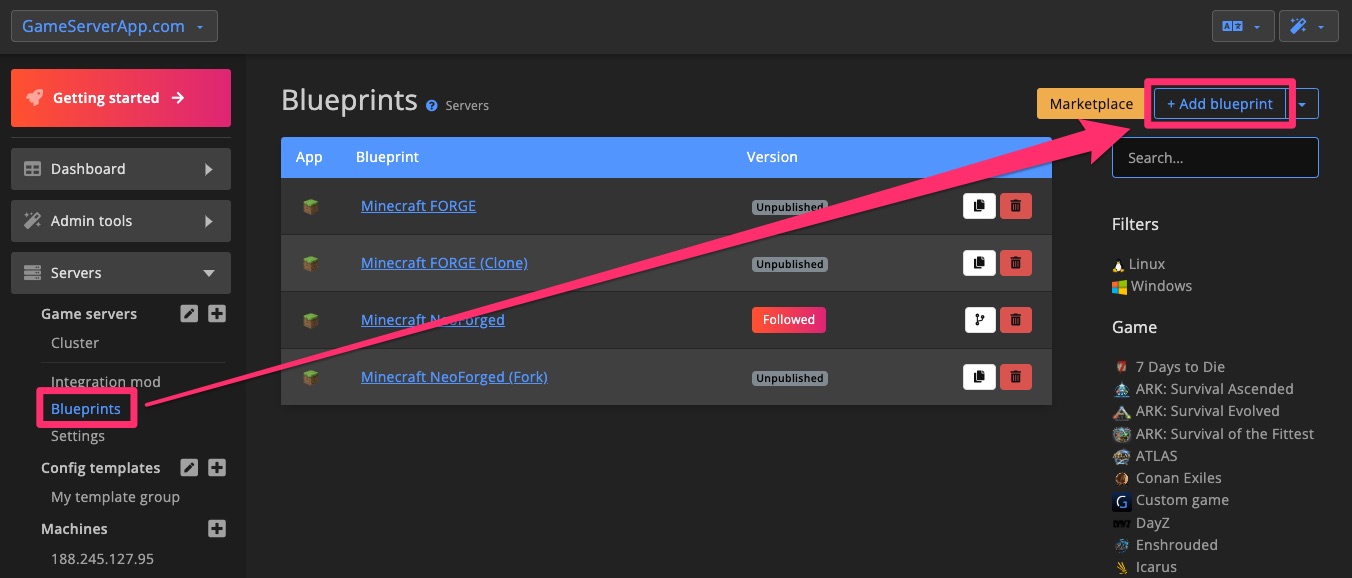
To create a new blueprint, go to the blueprint overview page and click the + Add blueprint button.
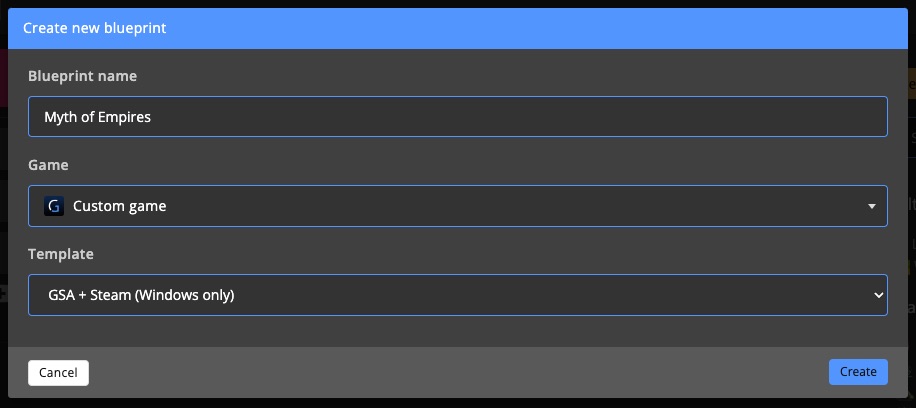
Enter a name for your blueprint and select the game it’s created for. If the game isn't listed, choose Custom game. You can also select a template (optional) to prefill parts of the blueprint form, making the setup process easier.
Import & Export
Add Version
When you need to update a blueprint, it's best to add a new version. This helps you keep track of changes and easily revert to previous versions if needed.

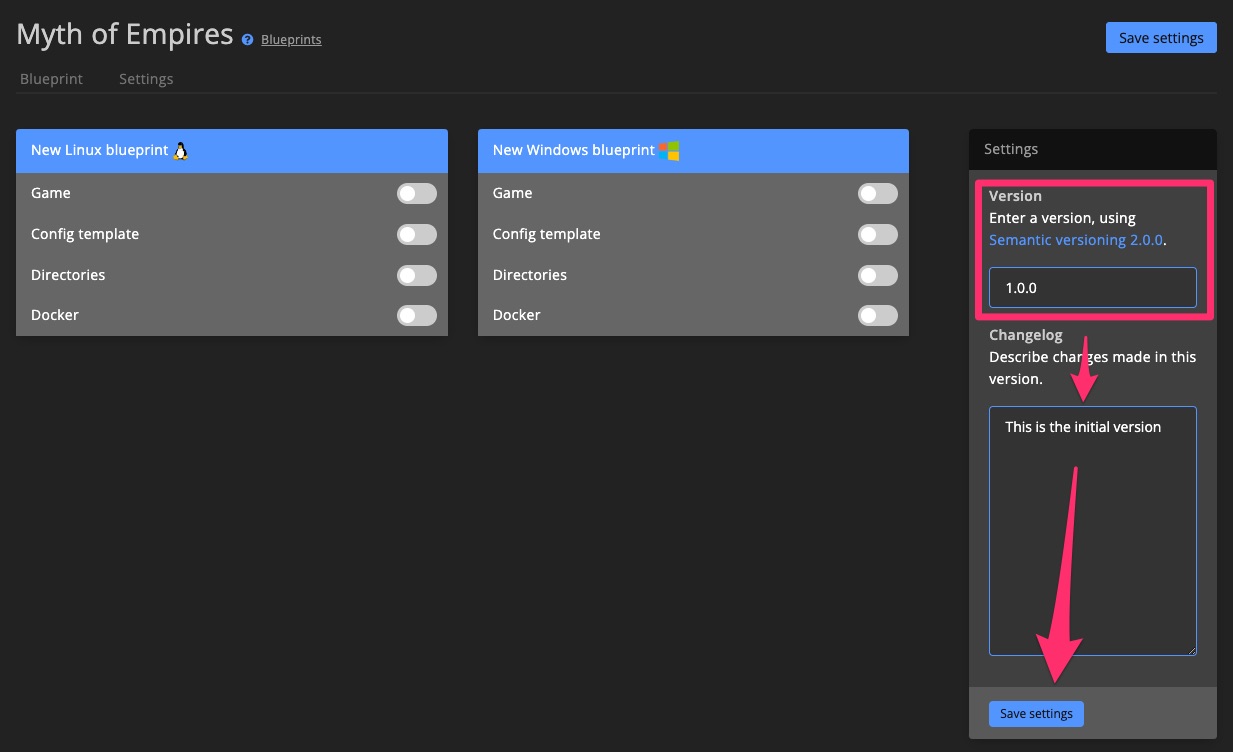
GameServerApp will automatically assign a new version number for each version you create. If you prefer, you can set a custom version number—just make sure it follows the Semantic Versioning 2.0.0 guidelines.
After setting up the Linux or Windows blueprint fields, you can optionally describe what you changed in the changelog field. This is particularly useful if you plan to publish the version on the marketplace, as it helps others understand what’s new.
Blueprint Versions
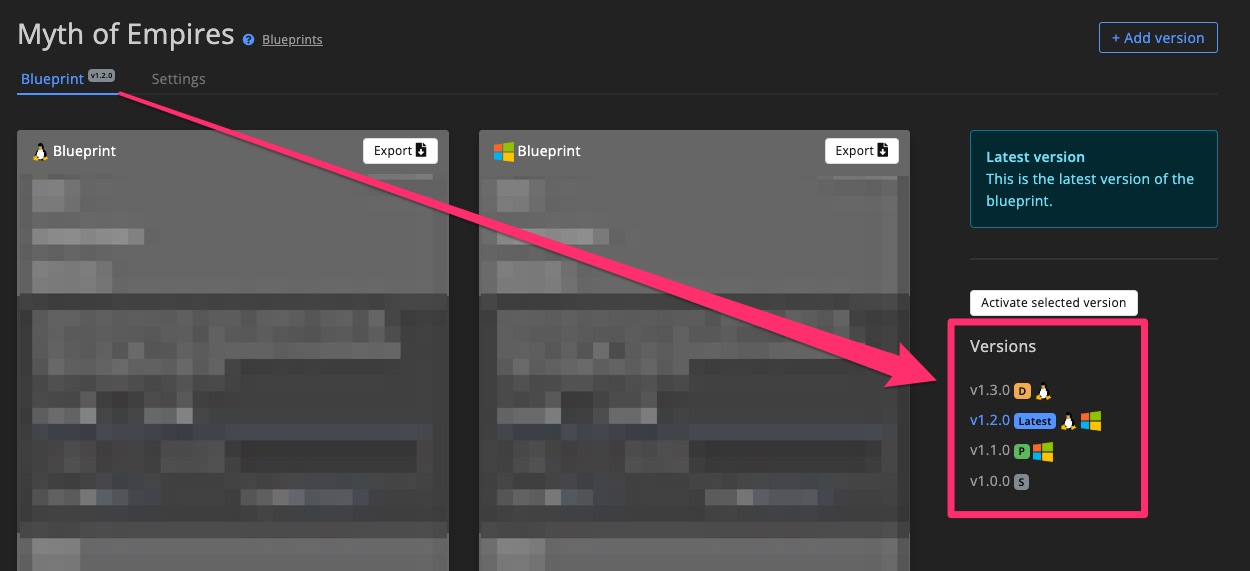
When viewing a blueprint on your dashboard or on the marketplace, you'll find a Versions menu on the right. This menu shows whether a version supports Linux, Windows, or both, and the state of each version.
Version State
Newly created versions will start in DEV mode. Versions in DEV mode are only visible on your dashboard, allowing you to experiment and test.
Private Blueprint
For private blueprints, you can use DEV mode for all versions. Publishing is not necessary in this case.
Marketplace Blueprint
If you plan to publish the blueprint on the marketplace, note that DEV mode versions will not appear there. This mode lets you test changes before making them public.
Only published versions will appear on the marketplace. You can identify a published version by the P or Latest label in the Versions menu. Versions with an S label are skipped because a newer version has already been published, so these versions are ignored.
Blueprint Form
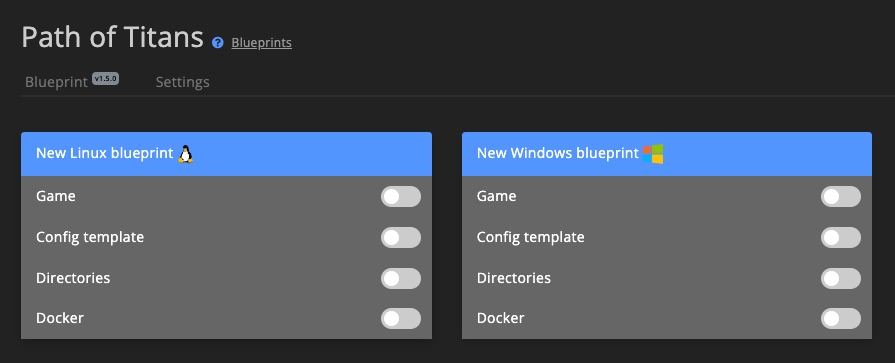
Each blueprint comes with two identical forms: one for Linux and one for Windows. If you only want to create a blueprint for Linux, you can leave the Windows form empty.
Each form consists of various sections, which are used to group related settings:
Game
All game-related settings are grouped under Game. These settings control how the game server works.
Type
Custom
The Custom game type currently doesn't have any settings.
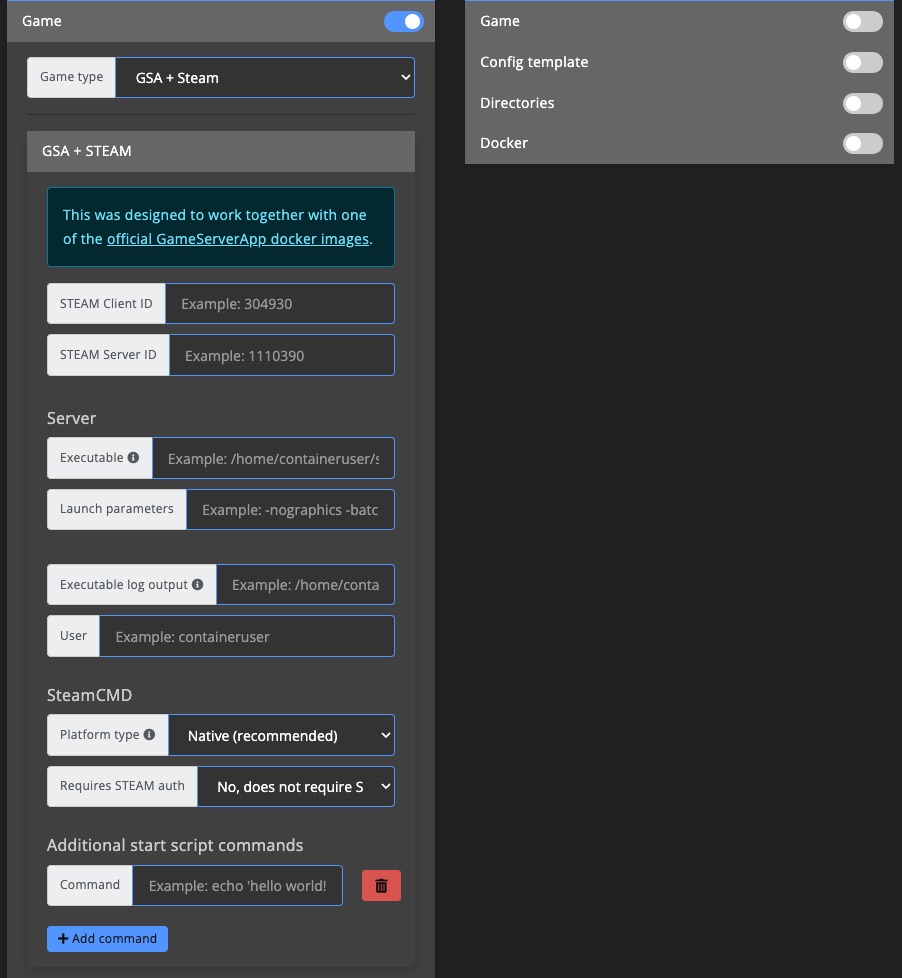
GSA + Steam
The GSA + Steam game type is designed to work with the Official GSA docker containers. This game type is the preferred method for all STEAM games.
If you want to create a GSA + Steam type blueprint, consider using the Create GSA + Steam blueprint guide >
STEAM Client & Server ID
Enter the STEAM Client & Server ID for the game server in the appropriate fields (Learn how to find STEAM IDs).
Examples:
- Client ID:
1371580 - Server ID:
1794810
Executable
Enter the executable path that works inside the container.
When using Official GSA docker containers, the game files are mounted to the container under /serverfiles:
- Linux:
- On host:
/home/GameServerApp/containers/XXXXXX/serverfiles - Inside container:
/home/containeruser/serverfiles
- On host:
- Windows:
- On host:
C:\GameServerApp\containers\XXXXXX\serverfiles - Inside container:
C:\Users\ContainerUser\serverfiles
- On host:
Example:
C:\Users\ContainerUser\serverfiles\MOE/Binaries/Win64/MOEServer.exe
Learn how to find the executable path >
Launch Parameters
Most game servers use launch/start parameters for settings like ports, passwords, and server list names. These settings often look like -Ports 7777 or -QueryPort 27015.
If you're unsure whether your game has launch parameters, check the game wiki or docs.
Example:
LargeTerrain_Central_Main -game -server -DataLocalFile -NotCheckServerSteamAuth -PrivateServer -MultiHome=0.0.0.0 -OutAddress={machine.ip} -SessionName={gameserver.list_name} -MaxPlayers={gameserver.slot_limit} -ClusterId={cluster.id} -Port={gameserver.game_port} -QueryPort={gameserver.query_port}
Executable Log Output
In cases where the game server does not offer any form of logging, you can use this option to have GSA write the console output to a new file on each launch.
For most game servers, this setting can be ignored.
Example:
/home/containeruser/serverfiles/logs
User
When using Official GSA docker containers, this should be set to containeruser.
For other docker containers, this can be ignored.
Platform Type
For situations where you're working with Proton and want to download the Windows game server files on a Linux machine, this option lets you specify which files are downloaded.
When you're on a Linux machine and want to run a Windows game server, you should set this to Windows.
Options:
- Native (recommended)
- Linux
- Windows
Requires STEAM Auth
Certain games can only be downloaded from STEAM while being logged into an account that bought the game you want to download.
If you are dealing with a game that needs STEAM auth to download the server files, you can enable this option. It will then use the STEAM auth credentials configured for the machine.
Additional Start Script Commands
Since every game has different needs, it is possible to provide extra commands to make sure the game server has the required software packages installed to run.
You can enter one or more commands in the Additional start script commands fields, which will run every time the game server starts.
Example:
chown -R containeruser:containeruser /home/containeruser
Command / Control Connections
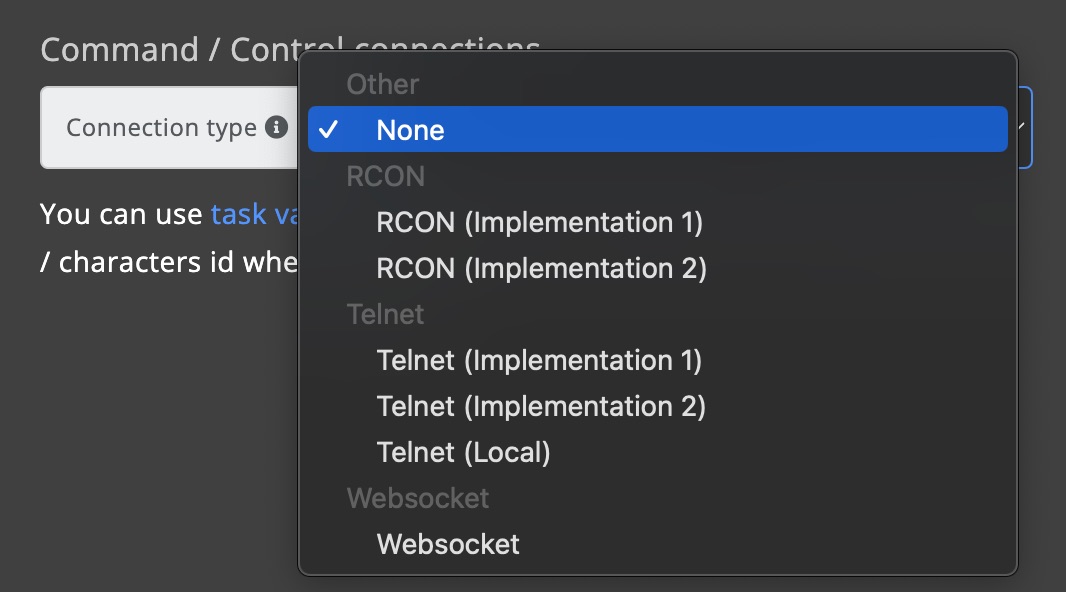
If the game you're working with comes with RCON, Telnet, Websockets, or other forms to send commands and instructions to the game server, you can enable that option here.
Besides selecting how GSA can connect with the game server, it also lets you customize what commands are sent to the game server. This allows you to customize how GSA broadcasts a message on the server, or what command is used to ban a player.
You can use variables in the commands, so GSA can automatically insert the right ID for different players.
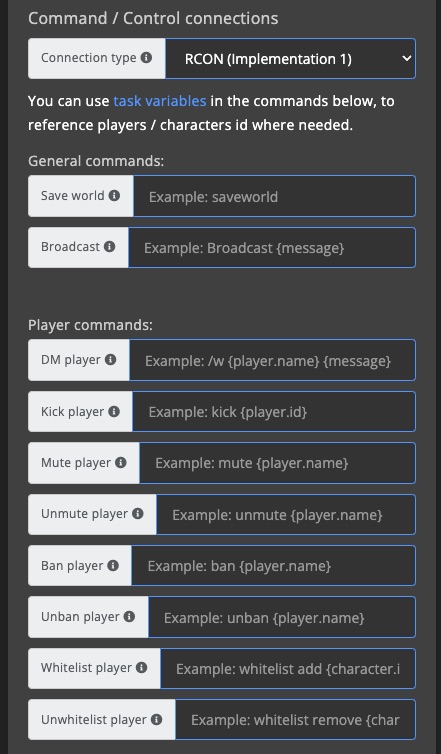
For most connection types, multiple implementations are available. If you are sure the game server you're working with supports RCON, but it doesn't appear to be working with GSA, you may want to consider trying a different implementation.
Monitoring
You can control how GSA will monitor this game server and whether it should try to recover it in case of crashes, etc.
Available options:
- Container (default): Checks whether the container is running or not
- Source Query: Checks whether the query port is responding or not
- RCON: Checks whether RCON / Telnet / Websockets, etc. is working or not
Recovery Mode
Setting recovery mode to Disabled will prevent GSA from trying to restart the game server. When it's set to Enabled, GSA will try to start the game server back up after a crash is detected.

Wipe Folders
Register which paths should have everything removed when a wipe is requested via the dashboard.
The entered paths should be relative to the container path on the host.
Linux
When you want to wipe the following folder: /home/GameServerApp/containers/XXXXXX/serverfiles/ShooterGame/Saved/SavedArks
Enter in the Wiped folders: /serverfiles/ShooterGame/Saved/SavedArks
Windows
When you want to wipe the following folder: C:\GameServerApp\containers\XXXXXX\serverfiles\ShooterGame\Saved\SavedArks
Enter in the Wiped folders: \serverfiles\ShooterGame\Saved\SavedArks
Backup Folders
Register which folders must be included in backups.
The folder name can be anything and is only used as a folder name inside the backup to group the files for the given path. The path must be relative to the container path on the host.
Linux
When you want to back up the following folder: /home/GameServerApp/containers/XXXXXX/serverfiles/ShooterGame/Saved/SavedArks
Enter as path: /serverfiles/ShooterGame/Saved/SavedArks
Windows
When you want to back up the following folder: C:\GameServerApp\containers\XXXXXX\serverfiles\ShooterGame\Saved\SavedArks
Enter as path: \serverfiles\ShooterGame\Saved\SavedArks
Custom Backup & Restore Scripts
These fields can be used to run special commands for creating and restoring backups. For example, when you want to include specific plugin files or filter out unneeded files.
Config template
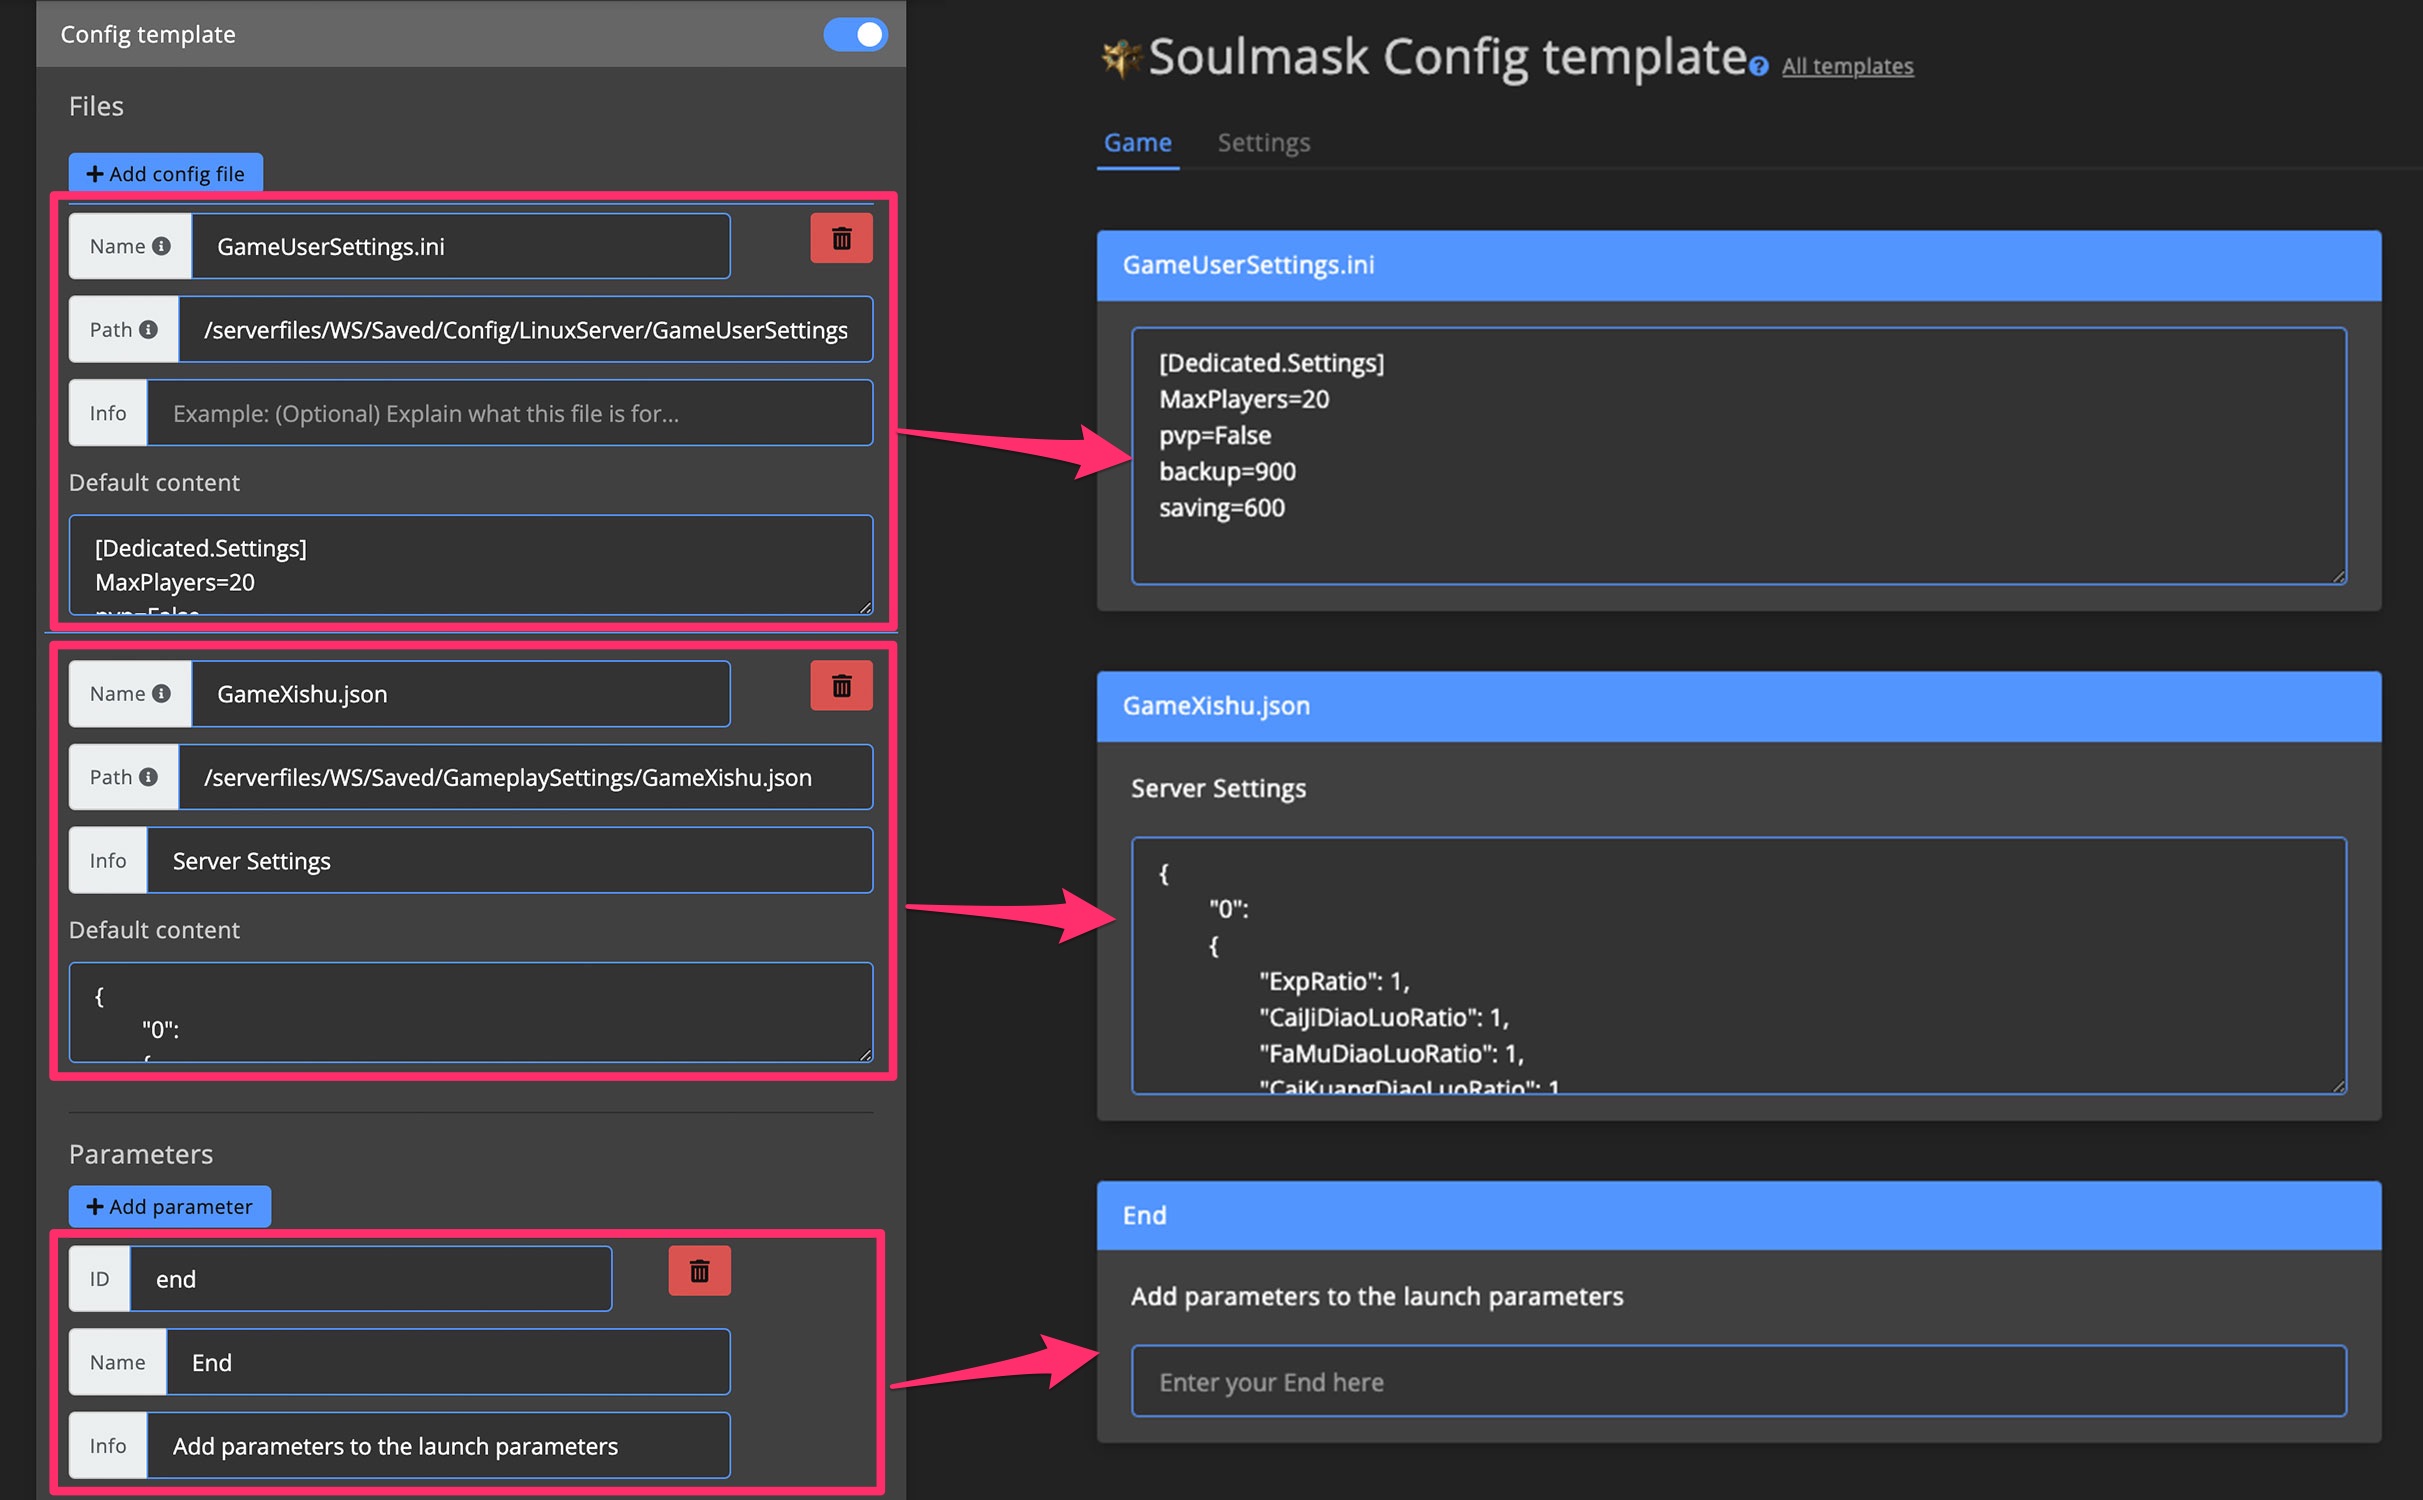
Blueprints let you control what fields are available on a Config template. You can use variables in both Files and Parameters to automatically fill in ports and other values.
Files
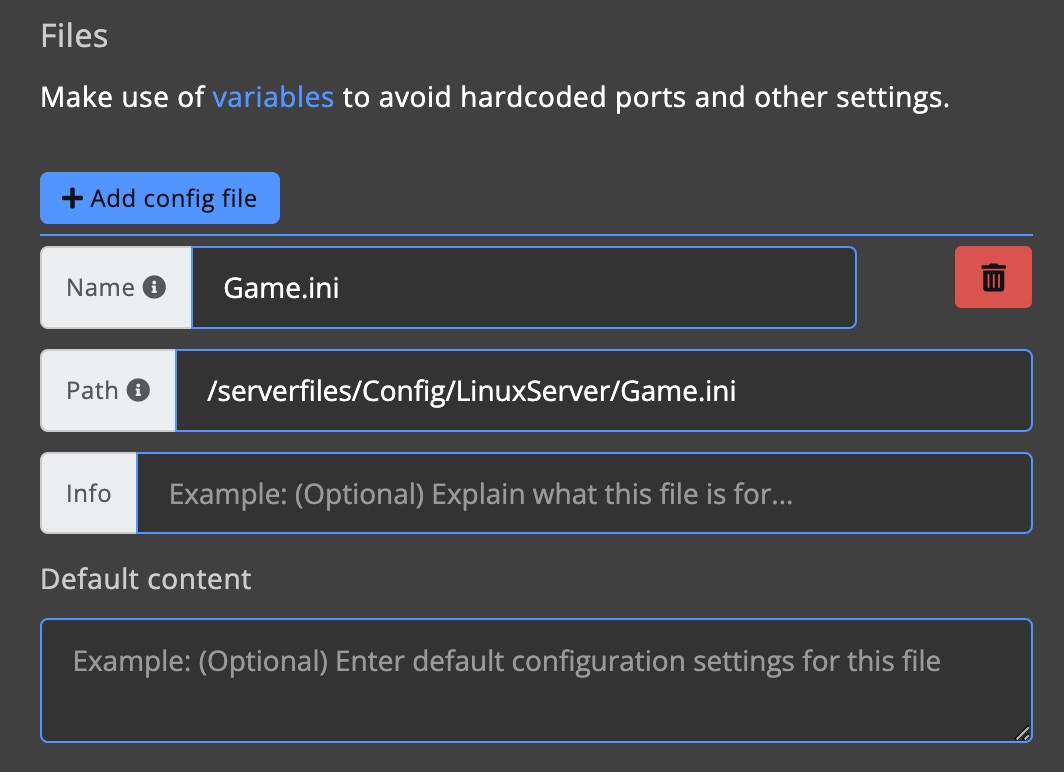
Register configuration files under Files. These are usually .json, .ini, or .cfg files, but they can be any kind of file.
For each file registration, you can use the following fields:
Name
This is the name used on the Config template.
Path
The entered path should be relative to the container path on the host.
Linux
Config file location: /home/GameServerApp/containers/XXXXXX/serverfiles/ShooterGame/Game.ini
Enter in path: /serverfiles/ShooterGame/Game.ini
Windows
Config file location: C:\GameServerApp\containers\XXXXXX\serverfiles\ShooterGame\Game.ini
Enter in path: \serverfiles\ShooterGame\Game.ini
Info
The Info field can be used to provide information about the config file.
Default content
When the Config template field for this config file is empty, the default content will be used. This is helpful when providing a fully working blueprint that includes configuration files.
Parameters
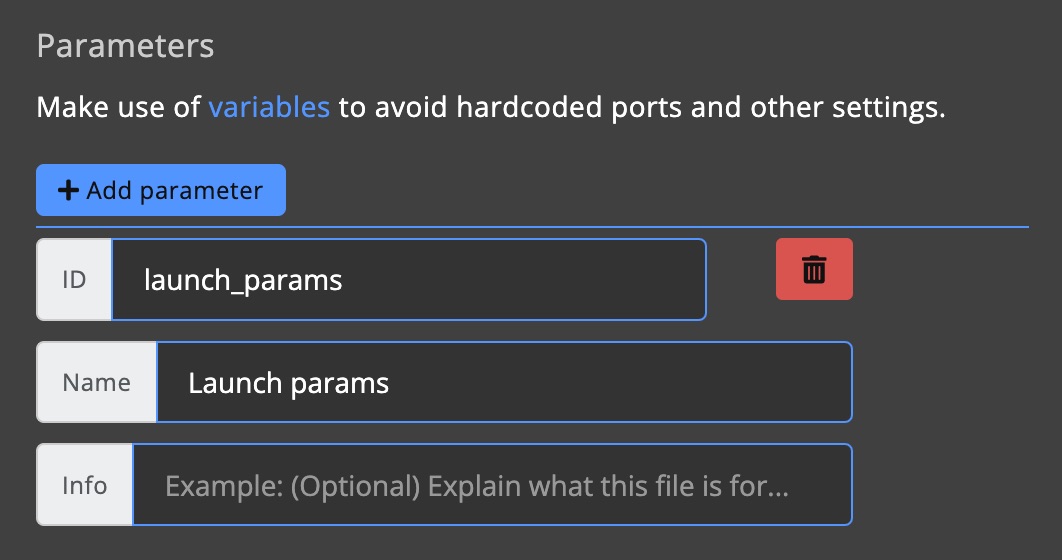
Most game servers use launch/start parameters for settings like ports, passwords, and server list names. These parameters typically look like -Ports 7777 or -QueryPort 27015.
For each parameter registration, you can use the following fields:
ID
The ID is used for referencing. For example, when using the {config_parameter id=""} variable.
For example, when the ID is launch_parameter, the variable would look like:
{config_parameter id="launch_parameter"}
Name
This is the parameter name used on Config templates.
Info
The Info field can be used to provide information about the parameter.
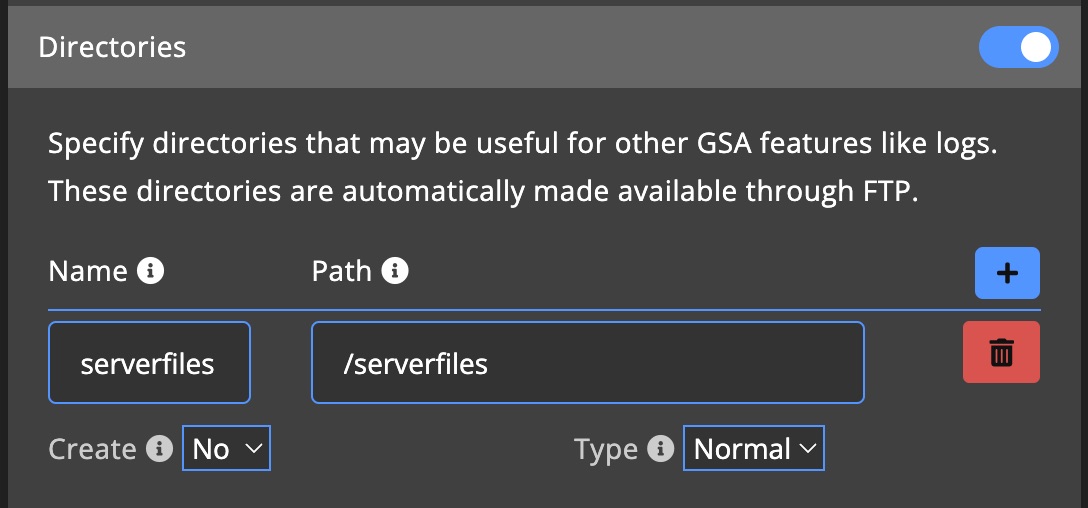
Directories
Registering specific directories can be useful when you want specific folders accessible through FTP or need a folder designated for plugins.
All folders registered under Directories are automatically made available via FTP. If a folder is missing after making a change, you may need to reinstall the game server for it to appear on FTP.
For each directory registration, you can use the following fields:
Name
The path will show up in FTP as the name provided. The path is mounted to a folder using name as its name.
Path
The entered path should be relative to the container path on the host.
Linux
Folder: /home/GameServerApp/containers/XXXXXX/serverfiles/ShooterGame/Saved
Enter in path: /serverfiles/ShooterGame/Saved
Windows
Folder: C:\GameServerApp\containers\XXXXXX\serverfiles\ShooterGame\Saved
Enter in path: \serverfiles\ShooterGame\Saved
Create
Determines whether this folder should be created during installation. For most cases, it's best to set this to No.
Type
Configure the kind of folder it is. For example, folders with the type Logs will be automatically scanned for log files, which are then listed on the Logs page for game servers.
Docker
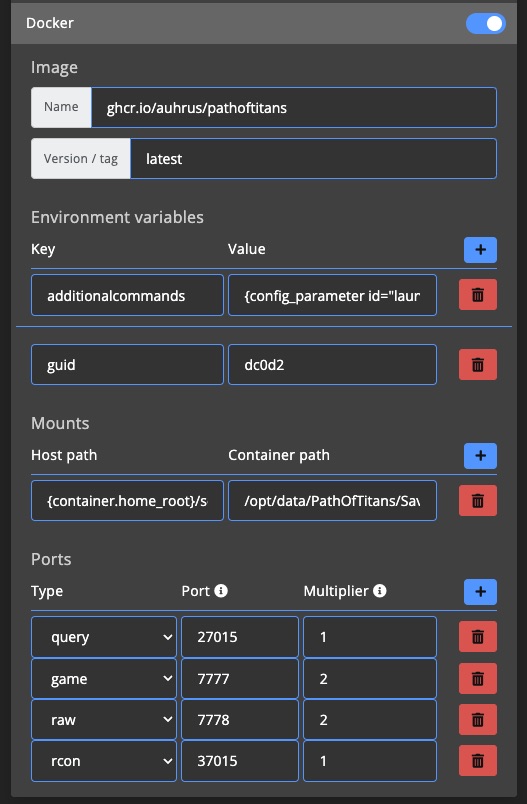
The Docker settings are essential for all blueprints as they form the foundation of every game server. If you're using an existing Docker container, refer to the Create blueprint for existing Docker container guide.
Image
The Docker image always requires an image name, while the version/tag is optional. However, it is recommended to always use a version/tag to avoid issues.
GSA will automatically pull public Docker images and ensure the correct version is present on the machine.
Official GSA Docker Images
We provide special Docker containers for the GSA + Steam game type. They are ready for use.
Linux
These Linux images can be used on all supported Linux Operating Systems.
Proton Support:
- Image:
gameserverapp/dediconnect-linux - Version:
proton-debian12
Basic Support:
- Image:
gameserverapp/dediconnect-linux - Version:
debian-12
Windows
These Windows images can be used on all supported Windows Operating Systems.
Use the {dynamic-os-tag} tag to allow GSA to automatically grab the correct version for Windows Server 2019 or 2022.
Unreal Engine Support:
- Image:
gameserverapp/dediconnect-windows - Version:
{dynamic-os-tag}-ue5
Basic Support:
- Image:
gameserverapp/dediconnect-windows - Version:
{dynamic-os-tag}
Environment Variables
Most Docker containers use Docker environment variables to override specific settings within the container.
For existing Docker containers, refer to the container documentation to learn more about environment variable usage.
Mounts
Mounts allow you to map a folder from the host machine to the Docker container.
Host Path
You can enter any path on the machine as the Host path. Unlike most other paths on the blueprint form, this path is not relative to the container folder. So you can also mount folders that are outside the container directory.
There are various path variables you can use, such as {container.home_root}, which points to frequently used paths like the container home directory.
Example:
{container.home_root}/serverfiles
Container Path
The Container path specifies where the folder from the host path will be mounted inside the container.
Ports
When mapping ports, specify the type of port (e.g., RCON, game port, etc.). The type helps GSA understand how to use the ports.
The multiplier assigns ports to game servers. The multiplier number determines how ports are distributed across game servers using the blueprint.
Example:
If the base port is 7777 and the multiplier is 2, the result would be:
- Game server 1: port 7777
- Game server 2: port 7779
- Game server 3: port 7781
Help
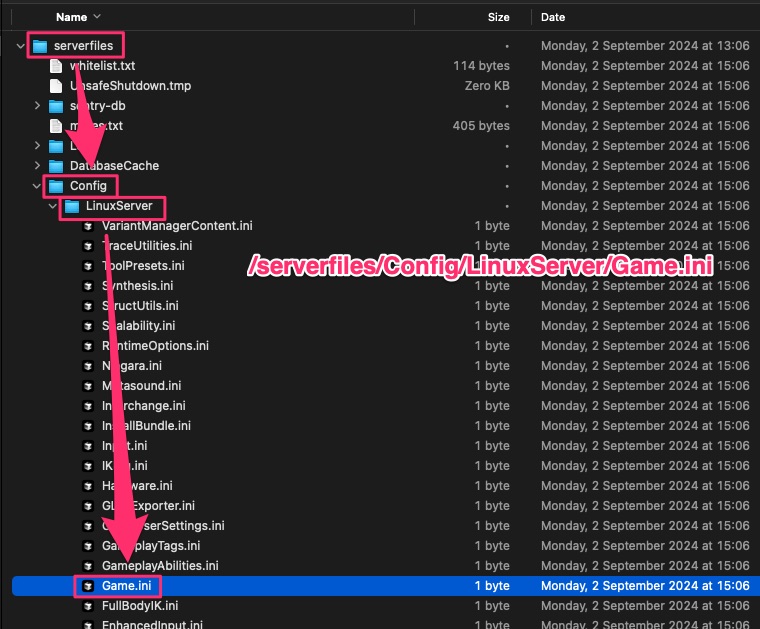
Find & Register Config Files
When unsure of the correct path for a config file you want to register, use the following steps:
-
Launch a server for the blueprint
You need to install a game server using the blueprint. Ensure you have at least one directory registered that points to theserverfilesfolder. -
Connect via FTP
Use your FTP client to access the game server. The FTP credentials are available on theConnectpage. -
Locate the config file
Find the config file on the FTP client and note the path. If unsure, check the game's documentation.
Example path:/serverfiles/Config/LinuxServer/Game.ini
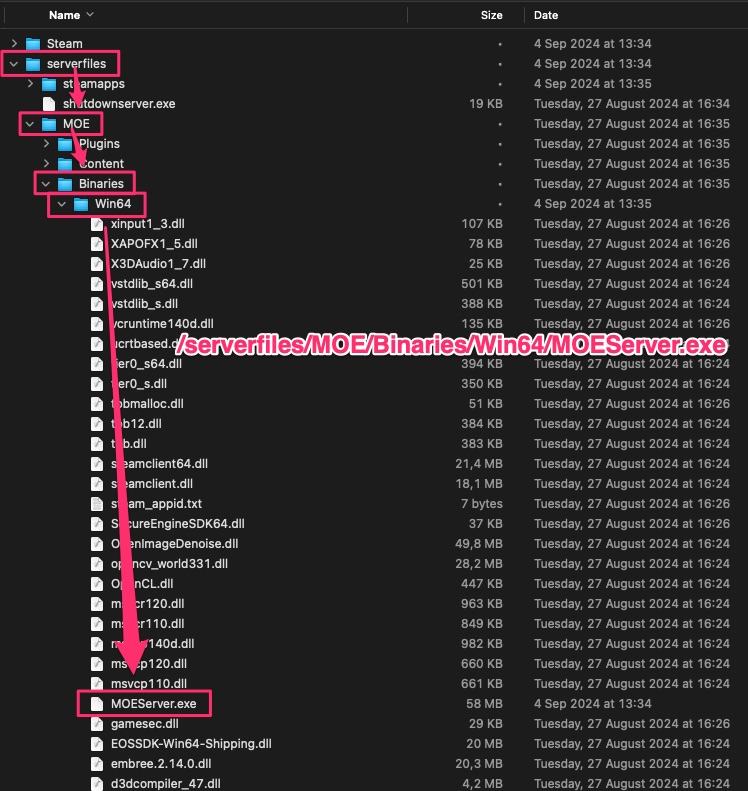
Find the Executable Path
To find the game server executable, follow these steps:
-
Launch a server for the blueprint
Install a game server using the blueprint. Ensure you have at least one directory registered that points to theserverfilesfolder. -
Connect via FTP
Use your FTP client to access the game server. The FTP credentials are available on theConnectpage. -
Locate the executable
Find the executable on the FTP client.
Example path:/serverfiles/MOE/Binaries/Win64/MOEServer.exe
Finding STEAM IDs
Client ID
The Steam store URL contains the STEAM Client ID. In this example, the STEAM Client ID is 1371580:
https://store.steampowered.com/app/1371580/Myth_of_Empires/
Server ID
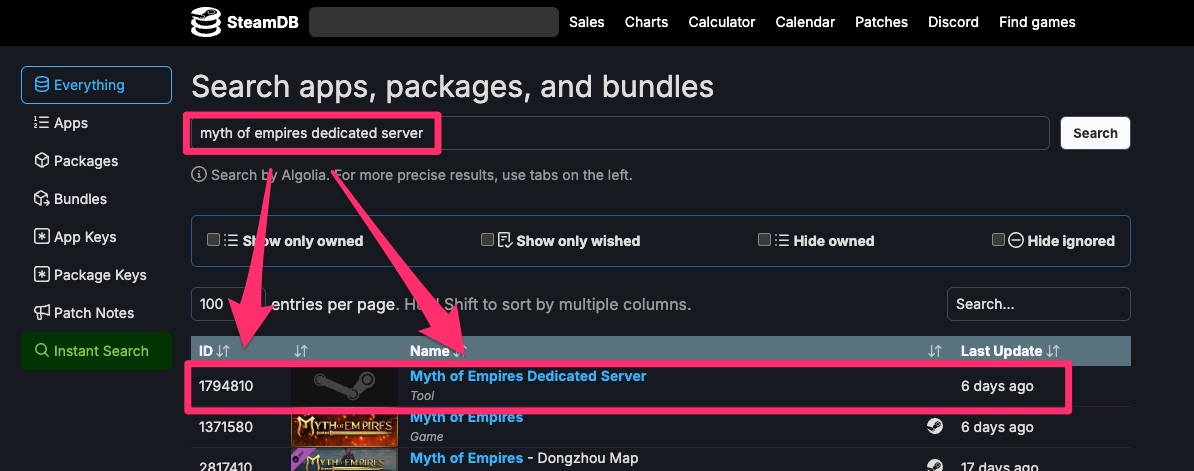
In most cases, the STEAM Server ID is different from the STEAM Client ID. Websites like SteamDB.info can help you find the Server ID.
Search SteamDB
Use the search feature on SteamDB.info to search for {game name} dedicated server.
For example: myth of empires dedicated server
According to SteamDB, the STEAM Server ID for Myth of Empires is 1794810.
